
Table Of Contents
- How Often Should You Clean Your 1911 Pistol?
- When Should I Clean My 1911 Pistol?
- What Do I Need to Disassemble and Clean a 1911?
- How To Disassemble A 1911 Pistol
- Steps to Disassembling a 1911 Pistol
- Complete 1911 Pistol Disassembly
- Clean a 1911 Pistol
- 1911 Pistol Reassembly
- Disassemble and Cleaning a 1911 Pistol Conclusion
- Recommended Reading
1911 pistols are rightly praised for their simple, reliable design, and their classic good looks. Though the design is over a century old now, the best 1911 pistols still perform as well as many more modern handguns. One of the responsibilities of owning any handgun is keeping it well-maintained. All weapons should be periodically stripped and cleaned, and those that you use most often will require cleaning quite often. In this article, we will go into great detail on how to disassemble a 1911 and clean it.
Cleaning a 1911 keeps all the mechanisms clear of rust, corrosion, and other debris. This extends the lifetime of your gun – with regular cleaning and perhaps occasional maintenance, there is no reason that a 1911 pistol will not last for many years.
Having a clean, well-maintained 1911 has other benefits, as well. Ultimately, if everything on the gun is well-maintained and clean, it will shoot better.

This makes it more accurate and improves your shooting performance, but also guards against the possibility that the gun will jam, and fail to fire at a critical moment.
Stripping, cleaning, and reassembling a 1911 pistol is actually a lot easier than you think. It’s certainly a more straightforward process than many more modern pistols, because the 1911 was designed as a military, open-carry handgun, and needed to be easy to maintain in the field.
It was therefore designed as quite a simple device, with no parts that are over-complicated.
Today, I’ll take you through the steps necessary to disassemble, clean, and then re-assemble your 1911. We’ll also take a look at what equipment you need to do this.
How Often Should You Clean Your 1911 Pistol?
As often as you like! I know plenty of folks who find the process of field-stripping a weapon, making sure everything is clean, and then putting everything back together, deeply therapeutic.
Once you’ve disassembled and cleaned your 1911 a few times, you’ll actually get really fast at doing it, and the process will eventually become an enjoyable one.
On a more serious note, there are certain times when you need to clean your 1911. If you’ve been out in the rain with it, or if the pistol has been exposed to extremes of heat, humidity, or dust, it is likely to be dirty inside, and should be cleaned.
When Should I Clean My 1911 Pistol?
Even regular use will necessitate you disassembling and cleaning your 1911 gun. Unfortunately, just firing rounds will end up depositing primer and other gunk inside your weapon, so after a few trips to the range, it will need a good cleaning.
People remain hugely divided on how many rounds can be fired before you need to clean your gun. To my mind, it depends on the ammunition you are using.
Cheap ammunition will leave heavier deposits, and so your 1911 should be disassembled and cleaned every 1,000 rounds.

If you only fire premium ammo, and are feeling a bit lazy, you can probably get away with firing 4,000 rounds before cleaning, but I wouldn’t recommend it.
What I would recommend, in truth, is setting reminders to clean your weapons once a month, or every six months, depending on how much you use them.
It’s easier to clean all of your weapons at once, because by the time you’ve got all the tools together, you might as well do the lot.
What Do I Need to Disassemble and Clean a 1911?
If you’ve never disassembled your 1911 before, don’t worry. It’s not as hard as it looks in the movies, and actually quite a simple and straightforward process. Before we get into that, though, there are a few things you are going to need.
1911 CLEANING ESSENTIALS (BUY THESE)
Everybody has their own preferences for tools and consumables, of course, but a minimal list would be:
- Gun Oil – an absolute must. A good gun oil will protect your weapon, and also reduce the frequency with which you need to clean it. My recommendation would be the Lucas Oil 10006, which I’ve found to be a reliable, relatively inexpensive oil that is suitable for almost any weapon.
- In addition to your gun oil, you will need copper removal fluid. This is a cleaning fluid that quickly removes copper deposits. It is a real hassle to get these off without this specialized fluid. My advice would be to get a tube of M-Pro 7.
- A barrel removal tool. As I will explain, some 1911s require a special spanner to remove the barrel. Luckily, there are such tools specially designed for the 1911, like the Real Avid Smart Wrench.
- A barrel brush, to clean inside the barrel. These are generally interchangeable between handguns, but if you haven’t got one I would recommend the Falco Tactical Bore Brushes, which I’ve found to be extremely long-lasting.
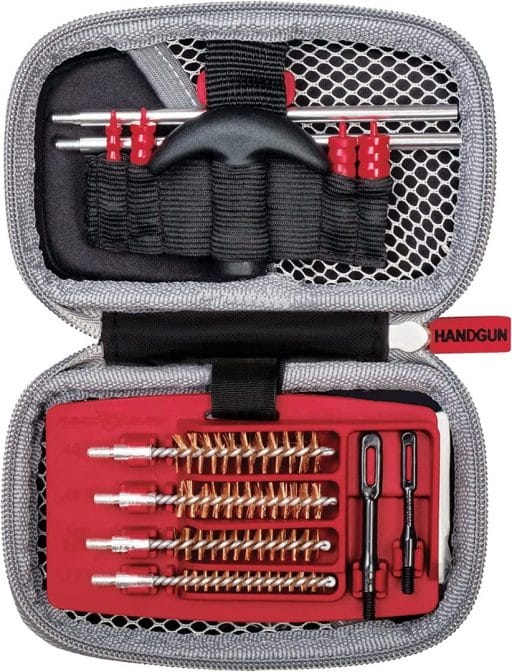
While you could buy all of these items separately, in practice it is easier to invest in a good gun cleaning kit that comes with all the necessary tools. If you own a number of handguns, you can generally use the same tools for all of them, so spending a little extra on a well-equipped kit will end up saving you significant time and money.
My recommendation here would be to go for the Real Avid Gun Boss Handgun Cleaning Kit, or, for a little bit more money, the Real Avid 1911 Pro Pack. Both are fully-featured kits that contain everything you are going to need, both for your 1911 and all your other handguns.
| Product Name | Where to Buy | |
|---|---|---|
 | Real Avid Gun Boss Handgun Cleaning Kit | |
 | Real Avid 1911 Pro Pack |
Real Avid Gun Boss Handgun Cleaning Kit

![]()
Real Avid 1911 Pro Pack

![]()
How To Disassemble A 1911 Pistol
Once you’ve got the right kit, you are ready to field-strip your 1911.
Before I describe this process, I cannot stress enough the importance of safety procedures in stripping down any weapon.
Check that the weapon is not loaded, and make sure there is no round in the chamber before you do anything.
 I’ll repeat that.
Check the gun is completely unloaded.
Steps to Disassembling a 1911 Pistol
Once you are certain the gun is not loaded, check once more, then you are ready to start taking it apart.
- Release the slide. The use of a bushing tool is handy for this step, and might be required if you have a tight match bushing. If you don’t have a bushing tool, you can accomplish this by pressing the recoil spring plug with one hand and rotating the bushing with the other. The bushing should rotate 90 degrees clockwise (when viewed looking down the muzzle toward the chamber).
- Use caution here; the recoil spring plug is under intense pressure and will fling itself out if you don’t keep control. Once the bushing is twisted clear, let the plug out carefully. I had something similar happen when stripping my Taurus PT1911; my secondary guide rod shot into our Christmas tree and it took several hours of intense searching to find the thing.

Removing the Plug from Spring on a 1911
- Now remove the plug from your spring and disengage the safety. Push the slide until the round cutout is perfectly aligned with the raised top section of the slide stop.

- You won’t be able to remove the slide stop until the takedown notch is correctly aligned. Push the slide stop out from the right side of the gun.

- Then, pull the slide stop out from the left-hand side of the frame and set it aside. Hold the 1911 upside down to prevent the link, recoil spring, or recoil spring guide rod from interfering with your next step. Then, pull the frame off the slide.
Removing the Slide Stop of a 1911
- Set the frame aside; you’re finished with this part for now.

- Holding the slide, remove the recoil spring. Then, twist the bushing counterclockwise, past the “normal” position as far as it will go to the right. This step lines up the tab inside the bushing with the recoil spring cutout.

- Push the barrel out; the bushing will slide out with it.

- Use your finger or a punch (or old 1911 firing pin, if you have one) to press the firing pin at the back of the slide. Keeping the firing pin depressed, slide the firing pin stop down. Use caution here; once you have the firing pin stop out of the way, the firing pin will move toward the rear of the slide quickly.

This should be the extent of your “normal” cleaning and maintenance for your 1911. But, every so often, you should do an extensive breakdown and cleaning.
Complete 1911 Pistol Disassembly
If you want to take your 1911 completely to pieces, there are several further steps:
- Take out the firing pin and firing pin spring from the firing pin channel. Using your punch, start the taking the extractor out. You might want to use a cloth to prevent marking the slide as you lever the extractor out. Finish pulling the extractor by hand.
- Now, you’re finished disassembling the slide. If you decide to take the sights off, you’ve moved into modification rather than cleaning.
- Check and clean the extractor and firing pin channels; these can accumulate an alarming amount of debris.
Breaking Down the Frame of a 1911
- Next, break down the frame. When you work on the frame, even just cleaning it, you should engage the safety.
- The hammer can be dropped with the slide removed which could damage the frame.
- First, remove the grips. Move the safety about halfway off, to the point between off and on (it won’t want to stay in this position).
- Lift the safety straight up, wiggling it as you pull. You’ll have to grip the tab on the safety itself to pull it out. The grip safety will now be loose.
- Start the plunger assembly out of the plunger tube with your punch or firing pin. You’ll need to push the slide-stop plunger in. Then, pull the two plungers out by hand. They should be attached to a string.
- Now, you need to put the hammer down. Get a strong grip on the hammer, pull it back a little, and pull the trigger.
- Gently let the hammer down until it stops.
- If you have a bench block, it’s recommended you use one for this step. You can remove the mainspring housing without one, but you take a chance of warping the frame by doing so.
- Use a punch or firing pin to push out the mainspring housing pin. You’ll likely need to tap it out with a hammer. Make sure you have a hole or some kind of free space on the other end for the pin to come out.
Avoiding Frame Warp on a 1911
- Make sure the hammer is down for this step. If you don’t, the compression of the mainspring can cause the frame to warp.
- Now, the mainspring and the grip safety will fall out of place. Next, gently pull the sear spring, which includes the sear, disconnector, and grip safety; it’s a three-pronged piece. At this point, all components of the backstrap have been removed.
- Flip the gun over and start removing pins.
- It doesn’t matter in what order you remove them, but the hammer and sear pins need to come out. Then, shake the frame; the hammer, disconnector, and sear will fall out.
- Now, remove the magazine latch. Push the magazine release in about 1/16-inch. Use a small screwdriver to turn the release counterclockwise.
- It’s not a screw, so it won’t come out. You might have to jimmy the release. Once you’ve turned the latch enough, the magazine release will drop right out. The trigger should also drop free. If it doesn’t, you definitely need cleaning.
For accompanying photos of each of these steps, I recommend checking out this incredibly detailed and useful photo-guide to 1911 disassembly.
Your frame is now completely disassembled. You should have a pile of small parts and three large parts (slide, barrel, and frame).
Clean a 1911 Pistol
Phew. In comparison to disassembling a 1911, cleaning the weapon is actually relatively straightforward. Once you have a pile of smaller bits and a few large ones set out in front of you, you can clean each in turn.
If you are cleaning your 1911 regularly, and you should be, then it is easy to see where deposits have built up. These can be washed away with your cleaning fluids and a vigorous scrub.
If you see any spots of corrosion starting to appear in your 1911, pay special attention to these areas, and make sure you clean them thoroughly – if you leave them on your weapon, they will spread quickly.
Use your barrel brush to give the inside of the barrel a good clean. It is difficult to see inside, of course, but the debris that builds up your brush should give you a good idea of how dirty it is. Once your brush comes back with little or no deposit on it, the inside is clean.
Lastly, give every part a good coating of gun oil. This will protect each part against corrosion until the next time you come to strip your weapon. Don’t worry if the parts feel a little slick and slimy after you have coated them in oil – you can wash off any excess once the gun is back together.
1911 Pistol Reassembly
Unfortunately, reassembling a 1911 isn’t just working these steps backward. That would be too easy.
Steps to Reassembling a 1911
- First, put the ignition system back together. You’ll do this step after reinstalling the trigger and magazine catch. Position the sear and disconnector like they will sit inside the firearm. Keeping them in that position, insert them back in the frame until the sear pinhole lines up with the hole in the sear. Tweezers can be helpful in this step.
- A little trick to this is to push the sear and disconnector into place while looking through the sear pinhole in the frame. Once they start to line up, catch them with the rounded end of a firing pin. Then, drop the sear pin into place from the left.
- Then, position the hammer under the hammer pin hole and insert the hammer pin. Make sure not to cock the hammer; if you do by accident, pull the trigger and manually push the hammer forward.
- Now, lift the hammer strut out of the way and insert the sear spring. There’s a notch for this inside the frame so everything should line up correctly. Verify that the sear spring engages the sear and disconnector.
Halfway There
- Slide the mainspring house partway into the frame to capture the bottom of the sear spring. Swing the hammer strut down and line it up with the mainspring. Don’t push the mainspring housing all the way in yet, as this would prevent the grip safety from being inserted.
- Once you’ve installed the grip safety, you can push the mainspring the rest of the way in. It will grab the tab on the grip safety and hold it in place. You can also drop the thumb safety through the correct hole (but you don’t need to line it up just yet) to help hold the grip safety.
- Now, you’ll need to tap in the mainspring housing retaining pin. This is another step where a bench press can be a handy tool. Cock the hammer. If it squirts out, you’ve forgotten to retain the mainspring housing.
- Reposition the thumb safety in the halfway position; the plunger assembly should be between the safety and its final resting point. Brownells sells a tool for depressing the plunger, but an old firing pin or an ink pen will also work.
For a step-by-step video explanation of the 1911 re-assembly, watch this informative video, courtesy of GUN TIME with Brandon.
At this point, everything else can be reassembled in the order it was taken apart. Be sure to oil all the parts before you put them back in place.
Disassemble and Cleaning a 1911 Pistol Conclusion
Whilst the instructions above might sound complicated when put on paper, in reality stripping down a 1911 is a relatively simple process. After all, soldiers have been stripping these pistols in muddy trenches for over a century now!
And once you’ve been through this process a few times, I promise you that it will become second nature. Once you have a gun in front of you, and have some knowledge of how it works, the steps you need to carry out are pretty obvious.
Once you get fast at stripping and cleaning your 1911, it might even become fun – an afternoon spent in the garage every month, stripping and cleaning your guns, can be a deeply relaxing experience.
Ultimately, keeping all your weapons free from corrosion, and firing true, is going to make you a more effective shooter, and reduce the possibility that your 1911 pistol is going to fail at that critical moment.
Recommended Reading
1911 Leather Shoulder Holsters


2 Responses
Thanks for a very detailed description of disassembleing a 1911,I’ll save this for future reference 👍🏼🤗
This is a terrific article for those of us new to 1911 pistols. A great help.