

There is almost a mythology around getting a scope zeroed. I have zeroed scopes for family, friends, and even strangers at the range because they somehow thought they weren’t capable.
Many first time shooters, and even more experienced folks, avoid zeroing scopes themselves, instead taking them to a range or local gun shop. This can take time, money, and ultimately sets the wrong frame – that is, that you need to be an “expert” shooter to zero a rifle scope, regardless of which scope you choose to use.
The truth is that it’s quite simple. In this guide, we’re going to show you exactly how to zero a rifle scope, step by step.

Table Of Contents
What is Zeroing your Scope?
 We see the terms sighting in and zeroing used frequently. For our purpose, they mean the same thing. To be more specific, zeroing is aligning the vertical axis of the scope so that the bullet impacts the point of aim at a specific distance. That distance is your zero distance.
Sighting in usually applies to left/right alignment as well but for most modern uses, so does zeroing. We are going with the modern usage. We want your rifle hitting dead center!
So, zeroing your rifle scope is aligning the point of aim with the point of bullet impact at a known distance. At least for the purposes of this article.
What you need to zero a scope
You are going to have to have a firearm capable of accurate enough shots. If you are looking at zeroing, you likely already have this.
You likely already have a scope as well but if not, there is an excellent resource here with some good advice on selecting a scope and some good choices for any price range. You will also need to have that scope mounted correctly to your firearm.
You need a target, I recommend one purpose made for zeroing, but any target with a small bullseye will work. Amazon’s best seller is ideal for visibility.
SplatterBurst Target

![]()
Lastly, you need a range with a long enough distance to zero appropriately and a way to measure that distance.
With all of those things, we are ready to begin!
Getting your Zero
The key to a good zero is not rushing anything and doing every step right. There are various methods that you can use to do this but if you are just starting out, do it correctly. Avoid any of these one-shot zero methods.

Bore Sighting
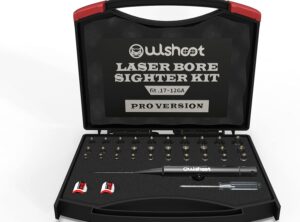
First and foremost, you want your rifle bore sighted. You can pick up a bore sighting kit and do it yourself if you like. If you don’t want to do that, most gun stores will bore sight your rifle for you for no charge.
Owlshoot Bore Sight Kit
![]()
If you do it yourself, pick a close range maybe only 10 yards and align the crosshairs of your scope with the red laser dot from the boresight tool. Takes minutes and will save you valuable time and ammo at the range. Get as close as you can!
Stepping Up
Different rifle calibers can call for different zero ranges. For most, it’s going to be 100 yards and that is the standard. You can usually double check this in your rifles manual or through your rifle manufacturer. Whatever that zero range, we want to get up to it slowly.
At the range, set your first target at about 25 yards for a 100 yard zero. You are going to take your first shot at this range. I highly recommend a set of sandbags for this step. They are affordable and invaluable! Without those, you want something you can use to steady your shot.
You don’t need a bullseye for this shot, just close. Once you are cutting paper near the bullseye, its time to increase the distance. There are differing opinions on this but I go to 50 yards next. Take a shot there at the center of the bullseye. If it misses the paper entirely for more than one round, go to a target at 30 yards first.
Once you are hitting close to the bull on a 50-yard target, its time to get to your zero distance.
Some people recommend shooting a 3 shot group at each target in this step. If you bore sighted, you probably don’t have to do this. It can help eliminate human error but it also uses ammo. For many rifles, that gets expensive fast!
If your rifle recommends a shorter zero, use the same proportions, 1/4 of the distance on your first target, 1/2 on the second. For a longer zero, you need to step it a few more times. 100 and 150 are the norms.
The Final Zero – The Gun Vice Method
With a target at 100 yards and your rounds on target at 50 yards, how well your shots are executed is important. If there is a single item at this stage that is invaluable, it’s a good bullet vice. I don’t recommend these for shorter shots but for the final zero, they are worth the marginal cost.

A good vice will hold the rifle in position and have enough weight to prevent undue movement.
You should also pick a day with little to no wind as that will throw you off as well. Sometimes it’s unavoidable but do what you can. Nature goes by its own rules.
Align your scope with the smallest center of the bullseye that you can see and take 3 shots that are the best of your ability. Take your time and make them count. Hopefully, they will all three land very close to each other.
If the impacts are far apart, slow down and try again. You want a solid group that is the best you and your rifle are capable of. What follows is my method for sighting in with a vice.
Move the vice until the point of aim is as close to the original point of aim as possible. When you are satisfied, adjust your scope until it’s in the rough center of your 3-shot group. Shoot another group, it should be on the bullseye.
Repeat this step until you get the results you want.
Top Gun Vice
Caldwell Lead Sled 3

![]()
The Final Zero – No Gun Vice Method
If you don’t have a gun vice, you need to go a little slower. You want to use the same distances and at least have a good set of sandbags. If you have neither, a backpack or range bag will work. Regardless, you want some way of keeping your rifle steady.
Start the same way with a great 3-shot group. See how far it is off in inches. Most scopes adjust in MOA which equates in our point of impact to roughly 1 inch of movement per MOA adjusted.
Start with your left/right (windage) orientation using the knob on the side of your scope. See how many inches you need to move and move the scope that many MOA to toward the center of your bullseye. Most scopes are 1/4 MOA per click but your scope manual can tell you for sure.
Try a second 3-shot group. It should be in the center of the target, either below or above the bullseye. You will need to repeat this step until your windage adjustment puts your group in the appropriate location. Don’t try to rush this and do windage and elevation at the same time. It will cost you more in ammo and time.
Once your left/right is good, its time to get the zero distance of your rifle set. This works the same way as windage but with the top knob on the scope. Adjust it the appropriate number of clicks toward the center of the bullseye.
Fire a 3-shot group again to see if you are on target. If not, you will need to go back and fine tune all of these steps. Sighting in without a vice takes patience and ammo if you want it done right. Be committed when you do this and don’t give up.
How to Zero a Scope Conclusion – Locking it In
If you are using a scope with caps on the adjustments, put those caps back in place to protect your zero. If your scope has zero-reset turrets, you can reset them to zero now. Make sure your scope and rifle are packed away in a fashion that will not case jarring to the scope.
That’s it. Job well done. If this is your first time, I recommend hitting the range several times with different wind conditions over the next couple of weeks. Fire a group and see how it does. Note the wind each time. With a variety of data points, you should be able to tell if you are zeroed correctly and how wind affects your bullet. This is good stuff to be aware of!


2 Responses
This method is fine with the assumption that the scope base and the bore center are parallel and aligned. If the rifle base is not aligned with the bore, there will be an angle between the scope and barrel. As distance is increased, the angle will show up and you may try to re-zero at that range.
It is required that the scope is opticaly zeroed in when doing a rifle zero and most scopes new are in that condition. Set up proper scope mounting setup. Now when your fire your first shot, you see the offset of the scope mounting bracket of the rifle and the rifle bore. This will be a consistent error at all ranges and tricking the adj knob will only cure the problem at that range. Better to measure the off offset and use MOA procd at diff dist and then make clk adj. T
Mark your scope zero at 100yds and use range dist to determine offset and make scope clk correction for distance. This will zero you at that dist. When finished, return scope settings to 100 yd set for ref for next diff distance..Much easier tha trying to align scope base to bore center.
after mounting a new scope can I except it to be at or near the center of its optical center ?