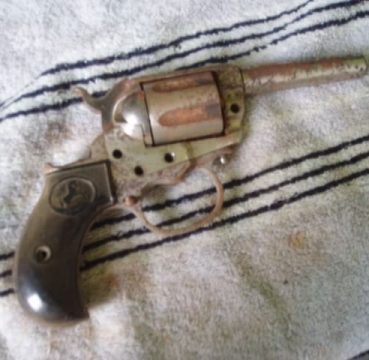
Antique firearms can make amazing showpieces, and they can be a heckuva lot of fun to shoot.
However, antique firearms have often lived hard lives. Before they’re ready for display (or ready for the range), they need to be properly restored.
Fortunately, it’s possible to restore an antique firearm yourself. You just need the right tools and a lot of patience.
Here’s how to do it.
Table Of Contents
Beginner’s Guide to Restoring Antique Firearms
The restoration process is fairly simple. The most important thing is to take it slow. Rushing through the restoration will yield subpar results.
With that in mind, let’s begin.
Decide What You Want to Do With the Firearm
The depth of the restoration process depends on what you want to do with the gun.
Do you want to shoot the firearm? Or will it just be a showpiece?
It’s a bit more work to ensure that an antique gun is safe to fire. But, if it’s just for show, you may only need to clean the firearm.
So, identify what you want to do with an antique firearm before you begin restoring it.
Get the Firearm Inspected by a Professional
Next, you need to know what needs to be fixed. It’s wise to have two professionals inspect the gun: a gunsmith and a historical firearms expert.
The gunsmith will tell you whether or not the firearm is safe to fire in its current condition, and what you’ll need to safely fire the gun. This is important information since modern ammunition is significantly more powerful than antique ammunition. Using off-the-shelf ammunition in an antique gun can be downright dangerous.
The historical firearms expert will tell you what sort of restoration is best for the firearm. Some antique firearms are worth more in their original condition, like a Model T with all original interior.
These two experts tell you what it’ll take to achieve your goal for the firearm.
Correctly Disassemble the Firearm
Find documentation or video instructions on the internet for correctly disassembling the firearm. Trying to disassemble an old gun without instructions can be difficult, at best. At worst, you may damage the firearm if you try to pull it apart incorrectly.
Learning how to take the gun apart is mandatory. You’ll need to disassemble the gun even if you only want to clean it.
Clean the Firearm
A good thorough cleaning is essential. Use non-corrosive cleaning agents like these to avoid damaging the finish.
For metal parts, use Simple Green to remove oils, grease, and dirt. Soak rusted components in diesel or kerosene for 3-5 days to soften the rust. After the soak, use copper to scrub the rust away. A copper pan scrubber works well. Avoid scrubbing with steel brushes or coarse steel wool as it can scrape away the finish.
To clean wooden components, use plain soap. Dawn dish soap is ideal. Use a toothbrush to clean away tough grime. You can remove small dents and gouges by steaming the wood with a wet cloth and a standard clothing iron.
Do not sand or scrape wooden parts! If you need to remove the finish, use 000 or 0000 steel wool. However, you should be very hesitant to remove the original finish, as you will likely need to have the wood professionally refinished.
Once your firearm is clean and dry, you can move on to restoring it to a firing condition. Or, if you want the gun in the original condition, you can simply reassemble it.
Restore the Finish
If you want to restore the exterior or prepare the firearm to be made safe to fire, you’ll need to re-blue the parts.
First, get yourself some decent cold bluing solution. Brownells Oxpho Blue or Birchwood Casey Perma Blue works well.
Next, make sure that you’ve thoroughly removed any grease and oil from the metal surface. Even if you’ve already cleaned the gun, it’s a good idea to wipe it down with alcohol to ensure that the metal is absolutely clean. You can also prep the surface with fine sandpaper if you need to remove imperfections.
Apply the cold bluing solution with a clean rag or applicator in a single pass. Let the bluing dry, then polish with fine grit sandpaper, 000 or 0000 steel wool. Apply several coats of cold bluing solution, polishing with the sandpaper or steel wool between each application. 3-5 applications will work. But, you can add more coats if you want a deeper black finish.
Cold bluing will restore the look of the metal, and protect it to a certain extent. However, it’s susceptible to rust and holster wear.
If you want a more durable finish, you should have the parts hot blued. It’s best if you take the gun to a professional for hot bluing, as the process requires boiling caustic liquids.
A last note of guidance: only blue parts that were originally blued. Adding a finish to components that were not originally blued can cause the gun to malfunction.
Get the Firearm Repaired
If your gunsmith cleared the firearm for use without repairs, you can skip this step.
On the other hand, if you need to repair the gun before you can fire it, you have two options:
1. Replace components.
2. Repair components.
For many popular antique guns, it’s possible to get replacement parts. For example, parts for an M1 Garand rifle are fairly easy to get. If you can replace damaged and worn components, you should. It makes your gun safe and reliable for shooting.
Unfortunately, it can be tough to find replacement parts for rare and very old firearms. In this case, you’ll need to have the components repaired.
A competent gunsmith can repair damaged parts. But, parts that are simply worn out are often irreparable. So, it may be impossible to make your antique firearm safe to fire.
But, no matter what, do not try to repair components yourself. It’s most likely that you’ll just make things worse. Always have a gunsmith make repairs to your guns.
Find the Proper Ammunition
Once your firearm is in working order, you need to ensure that it’s safe when you shoot it. As we mentioned earlier, modern ammunition is not the same as antiquated ammunition. So, you may need to get low-pressure ammunition to fire your gun safely.
Even if it’s not dangerous to use modern ammunition in your antique gun, it usually causes excessive wear on the components, which you may not be able to replace.
Conclusion – Finishing Touches
If you get your hands on an antique firearm, it’s totally possible to refinish it yourself. If you have doubts, this Yugo Mauser is a living proof that you can produce a great looking antique firearm with some basic skills and minimal monetary investment.
So, if you find an old gun, pick it up. It’s a great opportunity to start a really fun project and keep some history alive.






4 Responses
I have a question. I recently came across an old Parker double barrel 12 gauge. My gunsmith says the old wire barrels aren’t safe to shoot so I’d like to at least try to bring back the detailing on the stock, forearm and etching on the metal. This old dude is filthy. What can I use to safely clean the metal and wood without harming it. At one time this was a gorgeous firearm and it breaks my heart to see it in this condition. Any help or advise would be greatly appretiated.
Thanks,
Steve
I have an 1837 Harpers Ferry musket. I let a professional, historical gunsmith check it out and clean it up. It was missing the ramrod which the gunsmith made a new one.
The musket looks great and the gunsmith said it was safe to fire. My problem when I got the musket back was that the barrel of the musket had been shined along with the other metal. The musket looks good, but was this a mistake? The stock looks good, but the gunsmith did say that some of the barrel was cut off.
The musket does look good and apparently the metal did have a shiny finish at that time period? Any estimates for the value of this musket???
I hate to be the first to give a negative response but in antique restoration the last thing I feel you should to is try to reblue any antique firearm. The patina is history, it is how the original gunsmith intended… a shinny Model 94 just not look right….just my thoughts….Bob
I have to heartily disagree! I restore all of my antiques to as close to original condition as I possibly can. This includes re-bluing. The original finish WAS blued not “Patina”. At what point does “patina” become neglect? In my mind the answer is “as soon as it is detectable”. These are are NOT pieces of furniture they are TOOLS. Tools must never be allowed to degrade to the point where they have “patina” as “patina” is ACTIVE AND ONGOING SURFACE DAMAGE. A weapon that has “patina” is slowly disappearing and should either be restored or considered to be a “relic” sold cheap and hung on a theme restaurants wall. I shoot my antiques. Should I leave my antique cars rust alone? “It’s the same “historical patina” isn’t it? NO! I should completely remove the existing rust and replace the damaged sections with brand new material. This does NOT reduce the value of the car or affect the historical value so why do I have to LEAVE ACTIVE CORROSION AND DAMAGE on the surface of my antique firearm? Foolish thinking.